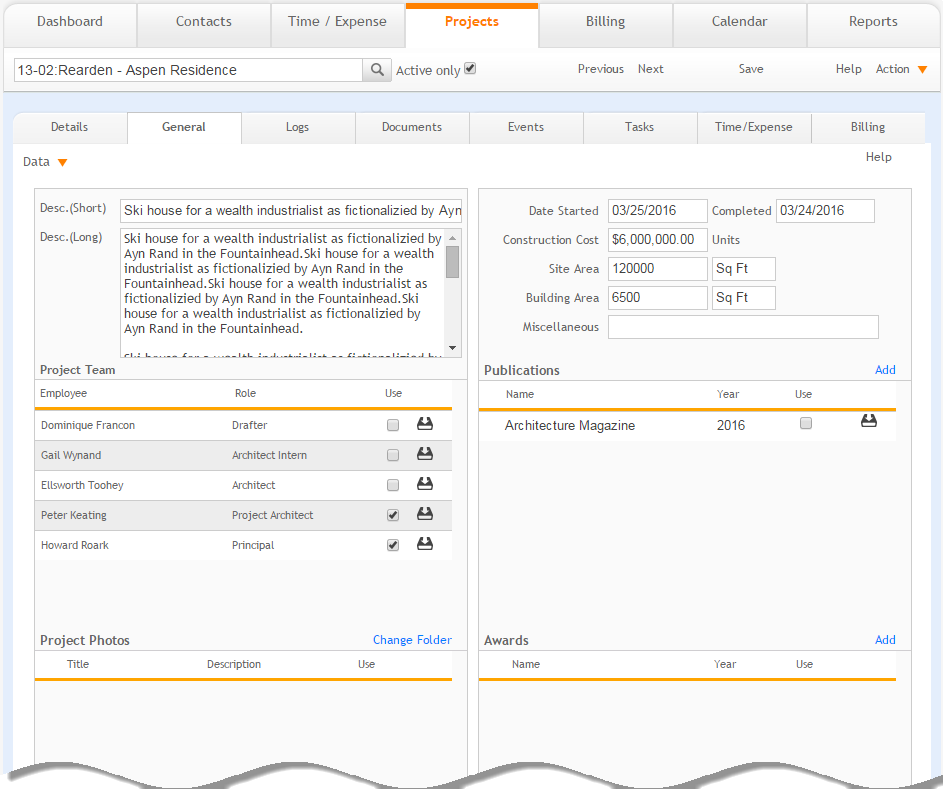
This screen is used to describe information about the project, typically after the project has been completed.

Description (Short):
Enter a short summary description for this project.
Description (Long):
Enter a long description for this project.
Date Started:
Enter the date this project was started. By default, it is pre-filled with today's date.
Completed:
Enter the date this project was completed.
Construction Cost:
Enter the construction cost for this project.
Site Area:
Enter the site area for this project.
Site Area Units:
Specify the units for the site area. The default for all new projects is specified in the preferences.
Building Area:
Enter the building area for this project.
Building Area Units:
Specify the units for the site area. The default for all new projects is specified in the preferences.
Miscellaneous:
Enter the miscellaneous information about the project.
Project Team
Use:
Select this check box to specify which project team members you want to include in the export for mail merging to new marketing materials. You might not want to include all your team members in the marketing materials.
Save ![]() :
:
Click ![]() to
save your changes.
to
save your changes.
Publications
Add:
Click to add new publications to the Publications portal.
Edit![]() :
:
Click ![]() to
make changes to a listed publication.
to
make changes to a listed publication.
Use:
Select this check box to specify which project publications you want to include in the export for mail merging to new marketing materials. You might not want to include all your publications in the marketing materials.
Delete![]() :
:
Click ![]() to
remove the selected item from the grid.
to
remove the selected item from the grid.
Save ![]() :
:
Click ![]() to
update your changes.
to
update your changes.
Project Photos
Change Folder:
Click this link to change the current folder. You can click on any photo
to open it in your default image viewer. You can also enter a description
for each of the photos, and review the photo details by clicking  Info. You need to use a photo
of an appropriate size for the template you are going to use for generating
marketing materials (experiment with your templates).
Use:
Select this check box to specify which project photos you want to include in the export for mail merging to new marketing materials. You might not want to include all your photos in the marketing materials. All the photos in the current folder will be displayed in this portal.
Save
![]() :
:
Click to save your changes.
Awards
Add:
Click to add an award received for a project.
Edit![]() :
:
Click ![]() to
make changes to a listed award.
to
make changes to a listed award.
Use:
Specify which project awards you want to include in the export for mail merging to new marketing materials by checking the Use check box. You might not want to include all your awards in the marketing materials.
Delete![]() :
:
Click ![]() to
remove the selected item from the portal.
to
remove the selected item from the portal.
Save ![]() :
:
Click to save your changes.
Folder:
Select a folder where all your project photos are stored. This will be one of the project folders that already exist for the project. You can then specify which photos in the folder you want to use for new marketing materials.
Button Panel
Help:
Opens the ArchiOffice Help in the Project section.