
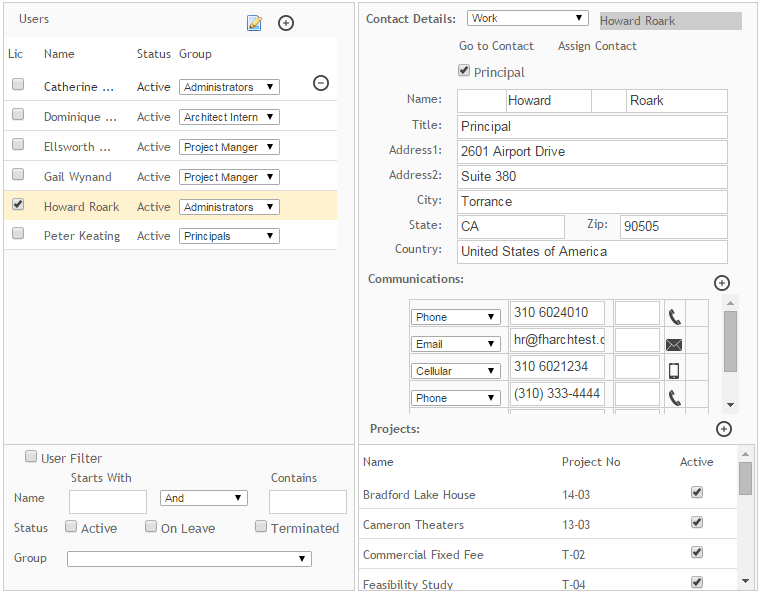
The Users - Details preferences enable general account information to be entered for the selected user. This includes user name, title, address, city, state or province, country or region, etc.
Users
Go to Contact Record ![]() :
:
Click ![]() after
a user has been added to go to the contact record for the selected user.
after
a user has been added to go to the contact record for the selected user.
Add New User ![]() :
:
To add a new user account to the Users pane on the left, click ![]() .
You will be prompted to enter the employee's User Name, Login Name, Password,
and Initials. The administrator will then be able to enter user account
details for this new user.
.
You will be prompted to enter the employee's User Name, Login Name, Password,
and Initials. The administrator will then be able to enter user account
details for this new user.
Lic:
Select this check box to assign one of the ArchiOffice licenses to the selected user.
Name:
This column displays the user names.
Status:
This column displays a user's status (for example, active, on leave, or terminated.). The status can be changed in the HR preferences.
Group:
Select a work group from this drop-down list to which you would like to assign a selected user. The user will inherit all the privileges of that workgroup.
Delete ![]() :
:
Click ![]() to
delete a user.
to
delete a user.
User Filter
To find a specific user of interest can be rather difficult by scrolling through the Users pane. The filter options provide a convenient method to limit quickly what users are being displayed in the Users list.
Name:
Use these options to search for users based on parts of their names.
Status:
Select one or more of these check boxes to filter the list by a user's status (that is, active, on leave and terminated).
Group:
Make a selection from this drop-down list to filter users by work group.
Contact Details
Contact Type:
Select the type of contact detail being entered from this drop-down list (that is, Home or Work).
User Name:
This read-only field displays the name of the user for which contact information is being added or edited.
Go to Contact:
Click this button to go to the user's employee contact record.
Assign Contact:
Click this button to assign a different contact record to this user.
Principal:
Select this check box to designate this user as a Principal architect.
Name:
Enter the user's name in these fields.
Title:
Enter a title for the user.
Address 1 and 2:
Enter the user's address detail in these fields.
City:
The city where the user is located.
State:
State or province where the user is located.
Zip:
The zip or postal code of the user.
Country:
The country or region where the state is located.
Communications
Specify the contact methods and detail for a user here. Communication methods include phone, email, pager, cellular, fax, Skype, and web.
Save & Add New ![]() :
:
Click ![]() to
add additional contact types and choosing a communication type from the
drop-down list.
to
add additional contact types and choosing a communication type from the
drop-down list.
Delete ![]() :
:
Click ![]() to
remove a communication type from the list.
to
remove a communication type from the list.
Projects
Use this option to assign projects to a selected user.
Add New Item ![]() :
:
Click ![]() to
select a project to be assigned to a user. You can select a specific
project, project type (that is, Billable, Internal and RFP) or project
status (Active, Inactive, Cancelled, etc.) and assign it to the selected
user. When you are assigned to a project type, say billing, you get added
to all the billing projects. Likewise, when you are assigned to a
project status, say active, you are added to all the active projects.
to
select a project to be assigned to a user. You can select a specific
project, project type (that is, Billable, Internal and RFP) or project
status (Active, Inactive, Cancelled, etc.) and assign it to the selected
user. When you are assigned to a project type, say billing, you get added
to all the billing projects. Likewise, when you are assigned to a
project status, say active, you are added to all the active projects.
Project Name/ No.
This displays the name and number of a project assigned to the selected user.
Active:
Select this check box to add the project to the user's My List.
Button Panel
Save:
Stores your settings.
Help:
Opens the ArchiOffice Help in the Preferences section.