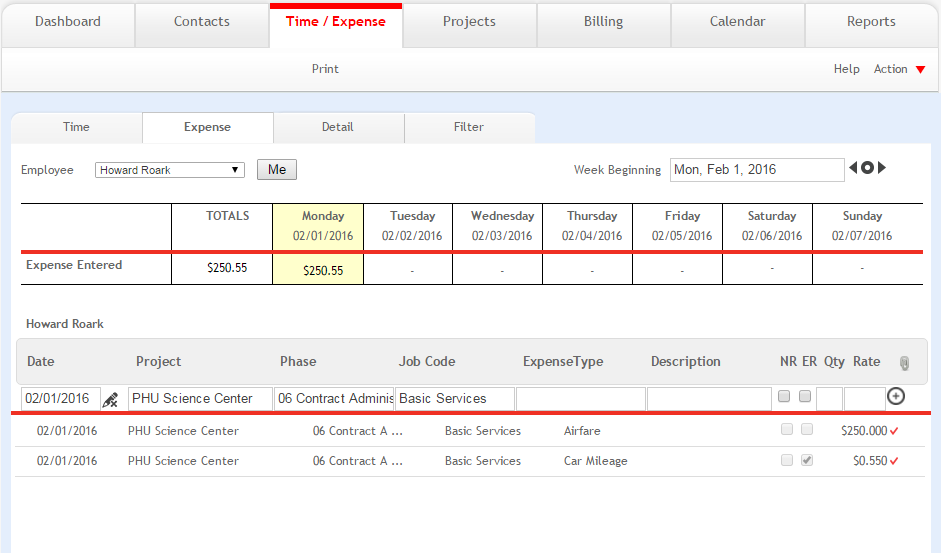
This screen works identically to the Time screen and is used for simple expense entries. This is where most users will record their project related expenses.

Employee:
Select the name of the employee for which you want to review expense entries. Click Me to view or enter your own entries.
 Only employees with proper privileges can enter time and expenses for
other employees.
Week Beginning:
Use this field to select the week in which you want to view, add or edit expense entries. Use the adjacent buttons to jump to the previous, next or current week.
Expense Card
You can see all the expense entries for the entire week by clicking the Totals column or only the expense entries for a particular day by clicking on that day (highlighted in yellow) on the grid.
Expense Grid
Date:
The date on which the expense entry was added.
 If you select a particular
day in the week (highlighted in yellow), then the new expense entry line
(top row) will use the selected date. The fields are pre-populated with
data, based on your users defaults
and the project, phase and job code selected with the last entered expense
entry.
Edit ![]() :
:
If you need to edit additional details not shown in the expense grid, hover the mouse pointer over the entry and click to go directly to the Detail View of that entry.
 If the Edit All Users Time/Expenses check box is unselected on the Preferences >
Users > Security screen, the time and expenses of other users can
be viewed but not edited.
Clear  :
:
Click to clear the entry detail fields.
Project:
Select the name of the project for which the expense entry is being created.
Phase:
Select the phase associated with the expense. If you select a project first, then only those phases for that project will display. If you do not select a project first, then all phases will display.
Job Code:
Select the code associated with the expense.
Expense Type:
Select the expense type associated with the expense (for example, car mileage).
Description:
Enter descriptive detail or comment for the new expense entry.
NR:
Select this check box if the entry is not reimbursable by the client.
ER:
Select this check box if an employee must be reimbursed for the expense.
Qty:
Enter the quantity of units for the expense (for example, mileage, hours, etc.).
Rate:
Displays the total expense amount.
Add ![]() :
:
Click ![]() to
save your entry and add it to the grid. Specify whether the expenses incurred
are non-reimbursable or employee-reimbursable by checking the appropriate
boxes. In addition, enter the quantity and cost of your expenses.
to
save your entry and add it to the grid. Specify whether the expenses incurred
are non-reimbursable or employee-reimbursable by checking the appropriate
boxes. In addition, enter the quantity and cost of your expenses.
Update![]() :
:
Click ![]() to make changes and save them.
to make changes and save them.
 To edit any entry on the grid, click on that item. The details for the
selected entry (highlighted in yellow) will populate the expense entry
line.
Attach![]() :
:
Click ![]() to
attach a receipt to the corresponding expense. This
option appears when you have chosen a project. You can click on
it to view the entry's attachment (for example, scanned receipt). ArchiOffice
accepts all files that you attach to the expense records, regardless of
the length of the file name.
to
attach a receipt to the corresponding expense. This
option appears when you have chosen a project. You can click on
it to view the entry's attachment (for example, scanned receipt). ArchiOffice
accepts all files that you attach to the expense records, regardless of
the length of the file name.
 This feature is only available in the ArchiOffice
Pro and Enterprise editions.
Status:
X |
Displays until all required expense entry information is completed by you. |
|
Displays when the required information has been entered. |
A |
If the workflow process is being used, this status indicates the entry has been reviewed and approved. |
|
Displays for expense entries that have been billed. When billed, the expense entry cannot be edited. |
H |
Displays for expense entries that have been placed on hold to reflect the time as non-billable to the project or to be released for billing at a later time. |
D |
Displays for those entries that are currently rendered on a draft invoice. When included on a draft invoice, the entry cannot be edited unless you delete that invoice. |
Delete![]() :
:
If you need to delete a time entry, hover the mouse pointer over the
entry and click ![]() .
.
Button Panel
Click to get a printout of the information displayed on screen.
Help:
Opens the ArchiOffice Help in the Time/Expense section.
Actions
List:
Select to view a list of expense entries.
Find:
Select to search for expense entries by certain criteria.
Re-Find:
Select to make modifications to a previous search requests.