
The Projects - Tasks screen displays the progress of each phase of a project based on the number of tasks completed. You can add, load or customize tasks for each project from this screen.
 The Tasks feature is available in the Professional and Enterprise editions
only.
The Tasks feature is available in the Professional and Enterprise editions
only.
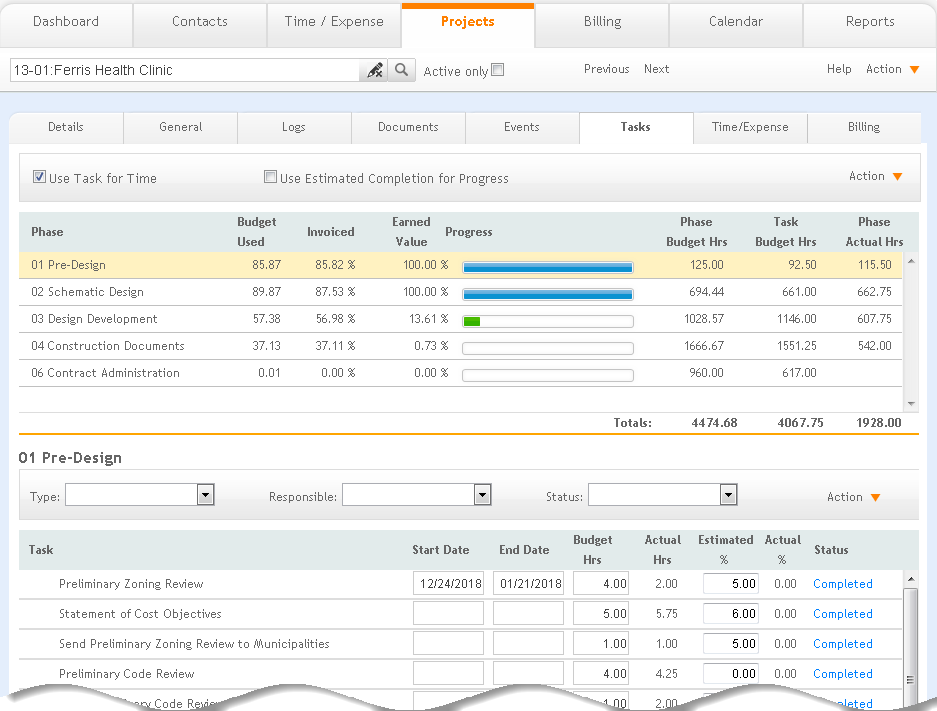
Use Task for Time
The default tasks for the phases are defined and managed in Preferences - Project - Tasks. When this option is selected, tasks display in the time and expense grid of the Projects - Time/Expense screen. When you enter time for that phase, you will see a list of tasks in the time entry ‘Description’ field. You can choose the corresponding task because it is now recorded with the time entry as well as at the task level.
 If this check box has been selected, when adding a sub-phase to a phase
that has not been used to record a time or expense entry, all job codes,
budget details, tasks, and time and expense entries are moved to the new
sub-phase. Otherwise, the budget and job codes will be moved to the new
sub-phase and you will be given the option to move the tasks.
If this check box has been selected, when adding a sub-phase to a phase
that has not been used to record a time or expense entry, all job codes,
budget details, tasks, and time and expense entries are moved to the new
sub-phase. Otherwise, the budget and job codes will be moved to the new
sub-phase and you will be given the option to move the tasks.
Use Estimated Completion for Progress:
When this option is selected, the progress bars are based on the estimated completion values manually entered in Task Detail View.
Action
Save:
Select to save your changes.
Refresh:
Select to display the most current information in the phase grid.
Load:
Select to load all the master tasks for each phase of the project from the default task list, a predefined library of tasks for default phases. The master tasks are set up and added in the Preferences screen. This action does not overwrite any of the current tasks or their status; it just adds the missing tasks. If Preferences have been updated with new tasks, you can load these at the project level.
Phase Grid
Expand/Collapse:
Phases that have sub-phases have an arrow next to them. Click this arrow to toggle between hiding and viewing child phases.
Phase:
Displays the name of main and sub-level phases.
Budget Used:
Percentage of the budget assigned to the phase.
Invoiced:
Percentage of the budget that has been invoiced.
Earned Value:
The value in this column indicates the amount of work completed as a percentage.
The earned value analysis
and comparison data is available in the ArchiOffice Enterprise and Professional
editions only.
Progress:
This column provides a visual measure of a phase's progress.
Phase Budget Hrs:
This column shows the number of hours budgeted for each phase. This information is entered in the Project - Detail view.
Tasks Budget Hrs:
This column shows the number of hours budgeted for tasks. You can update these values in the task grid below.
Phase Actual Hrs:
The value in this column shows the actual number of hours completed for each phase.
Phase Details
Type
Make a selection from this drop-down list to filter the grid by task type.
Responsible:
Make a selection from this drop-down list to filter the grid by the employees responsible for the project.
Status:
Use this field to filter the list by completion status (for example, pending or completed).
Action
Save:
Choose this option to save changes made to task settings.
Main:
Select to add a root task.
Sub:
Select to add a child task to the selected task.
Move Up/Move Down:
Select one of these options to change the phase order.
Task Type:
Select this option to add new task types to the project. These are project specific.
My List:
Project tasks that you are actively involved with as a project team member can be viewed by selecting this option.
List:
Choose this option to display the current found set of project tasks.
Find:
Select this option to locate a particular project task and return a found set displaying the results in a List View.
Re-find:
Select to refine the last find you performed.
Task Grid
Edit ![]() :
:
To see the Task
Detail View, click ![]() at the beginning
of each row for the task and it will open it in the detail view.
at the beginning
of each row for the task and it will open it in the detail view.
Expand/Collapse:
Tasks that have sub-tasks have an arrow next to them. Click this arrow to toggle between hiding and viewing child tasks.
Task:
This column displays the name or description of the task.
Start Date:
This is the start date of the task, which can be edited.
End Date:
This is the task's end date, which can be edited.
Budget Hrs:
This defaults to zero, giving equal weight to each task in the phase. This can be changed so that some tasks have greater weight in calculating the completion progress of all tasks for the phase.
Actual Hrs:
This reflects the actual time logged to this task.
Estimated Percent Complete:
This column displays the estimated percentage of completion of a task.
Actual Percent Complete:
This column displays the actual percentage of completion of a task.
Status:
The current Status of the task (Pending, Completed, Not Applicable). Click on the status to move the task to the next stage.
Delete ![]() :
:
Click ![]() to remove the selected tasks.
to remove the selected tasks.
Your ability to work with tasks (for example, create, assign resource,
set due date, create a To-Do item, delete, etc.) is strictly controlled
by the security privileges assigned by the administrator.
Button Panel
Search  :
:
Use this search field to locate projects quickly . The field's predictive search instantly display results as you type in this field.
Active only:
Mark this check box to search only the active projects.
Previous:
Click to display the previous project record.
Next:
Click to display the next project record.
Help:
Opens the ArchiOffice Help in the Projects section.
Action
New:
Select to create a new project.
Duplicate:
Select to duplicate an active project record.
Delete:
Select to delete a project. This is a secure privilege available only when specifically allowed in the Preferences screen.
My List:
Select to view projects assigned to you.
List
Select to view a list of all projects.
Find:
Use this option to locate projects matching specific criteria, with the resulting Found Set displayed in the List View.
Re-Find:
Select to return to the last Find criteria so you can modify the requests before executing the search.