
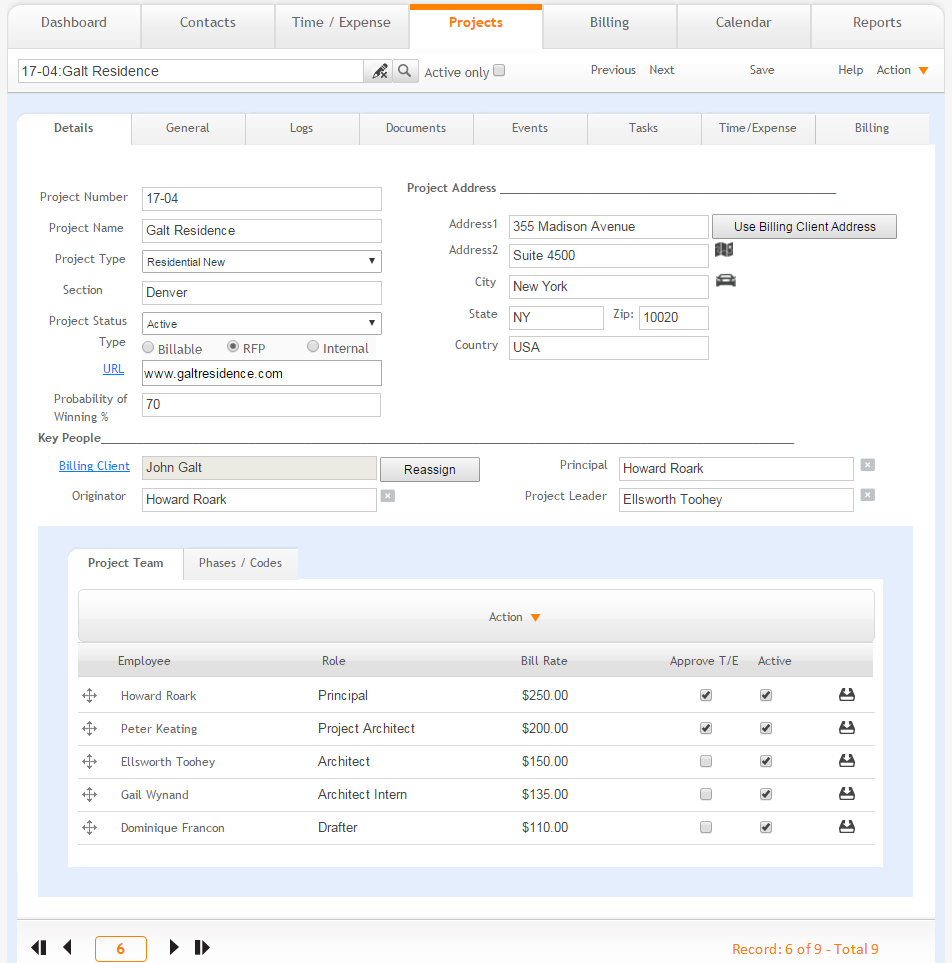
The Projects - Details screen is used by authorized users to set up project specific information including Project Name, Project Type, Billing Client, Status, Team Members and Rate, Project Contacts and Role, Phases, as well as Job Codes and associated rates.
Project Number:
The Project Number field is entered when the project is created. This number can be anything you want, up to 11 characters in length. Creating a project is a secure privilege. After a project number has been assigned to a project it can only be changed by a user with the proper privileges. This user must also have the rights to rename the project's document folder on the ArchiOffice Server.
 When creating a new Project, if you use a number other than the next
in the sequence, the sequence is not incremented (auto increment number
does not get used).
When creating a new Project, if you use a number other than the next
in the sequence, the sequence is not incremented (auto increment number
does not get used).
Project Name:
The Project Name field identifies the project by name. You should be as descriptive and concise as possible for users to identify the project easily.
Project Type:
The Project Type field is used for classifying your projects. The Type drop-down list is defined in the Preferences area by the administrator.
Business Unit (Department):
Enter the department or unit name associated with this project or the office location (if you have multiple offices). You can label the department or business unit whatever you like on the Preferences > Project > Defaults screen.
Project Status:
Specify the status of your project. When a project is completed or changed, you can edit the status accordingly. Below is a list of status options available in ArchiOffice.
Active |
Used for active, ongoing projects |
Inactive |
Used for inactive projects that might be on hold |
Cancelled |
Used for projects that are cancelled |
Completed |
Used for completed projects |
RFP-Awarded |
Used for RFP projects acquired by the firm |
RFP-Lost |
Used for unsuccessful RFP projects that the firm could not acquire |
RFP-Open |
Used for new RFP projects not yet acquired by the firm |
Template |
Used for projects that you want to save as a template. This template can be used at the time of creating new projects. All its data from the Projects > Details screen is copied to the new project, if selected. |
If you select Inactive or Completed, the project is removed from the active list of projects and does not appear on entering time. However, all the projects are included in the reports, irrespective of their status. To include only active, billable projects on reports, see the Search button function in the Reports topic.
Type:
Use the Billable/RFP/Internal options to flag the project according to the type of work done on it.
URL:
Enter a URL or web address associated with a project, if any. Click the URL to navigate to that address on the Internet.
Probability of Winning:
Probability or chances of acquiring a project in terms of percentage.
This option is visible only for the RFP type projects.
 This feature is available in the ArchiOffice
Enterprise and Professional editions only.
This feature is available in the ArchiOffice
Enterprise and Professional editions only.
Project Address
Address 1 & 2:
The street address of the project location. The field size should not exceed 55 characters for each line.
Use Billing Client Address:
Click this link to populate the address fields automatically with the client's billing address.
City:
The project location's city. The field size should not exceed 45 characters.
State:
The two-letter abbreviated name of the state or province where the project is located.
Zip:
The project location's zip code or postal code. The field size should not exceed 14 characters.
Country
The country or region where the project is located.
Street Map

Shows street map for the address mentioned.
Driving
Directions 
Shows driving directions to the mentioned address.
Key People
Billing Client:
Click the label of this field to go to the contact record of the client whose name is displayed.
Reassign:
Use the Reassign hyperlink to assign a different Billing Client to this Project. You will first perform a Find and then select the new contact from the Contacts List View.
Originator:
The originator will automatically default to the user who created the project.
Principal:
Enter or select the employee who is assigned the Principal role for a project.
Project Leader:
Enter or select the employee responsible
for leading the project in this field. Click  to clear
the value of this field.
to clear
the value of this field.
Action
Assign Employee
Use the Assign Employee link to add additional Project Team members.
Assign Team
Use the Assign Team link to assign an entire team of employees (defined in Preferences) with their respective roles and rates to the project.
Team members already on a project cannot be added again. The rates
of the existing members will not be updated to reflect the newly assigned
team.
The role of employees
is transferred when assigned to a project.
You can reorder the project team list by dragging and dropping them
at the desired location. Click  and hold the mouse button on the row that is to be moved and then
release the mouse button at the target location (for the project team
being repositioned).
and hold the mouse button on the row that is to be moved and then
release the mouse button at the target location (for the project team
being repositioned).
Update Rates
Use the Update Rates link to update the billing rates for all active Project Team Members using the latest user defaults from Preferences.
Grid
This grid displays employees assigned to a project team in addition to their bill rates, time and expense entry approval and activity status.
Employee:
Displays team member names.
Role:
Displays the role of assigned team members. When a role of an assigned team member is changed, it prompts you to update the role for the time and expense too. You can either select All T/E Slips, Current T/E Slips or None to cancel.
Bill Rate:
Displays an employee's bill rate. Click the field to edit the rate. When the employee's team bill rate is updated, it prompts you to update the bill rate for current slips. You can either select Current T/E Slips to update the entries or None to cancel.
Approve T/E
Select the check box in this column for any employee you want to have the privilege to approve time and expense entries.
Active
Select check boxes in this column to designate the employees that will be actively involved with the project. Employees who are not marked active will not be able to create time and expense entries for this project. If you click the Active header link, you can assign the Active or Inactive status to multiple team members at once.
Save ![]() :
:
Click ![]() to save changes for a listed team member. If you modify the bill
rate, clicking
to save changes for a listed team member. If you modify the bill
rate, clicking ![]() prompts you to update the
bill rate for the slips that fall beyond the specified date here. Clicking
the on Current T/E Slips button
updates the bill rate for the slips that fall on the current date specified
here.
prompts you to update the
bill rate for the slips that fall beyond the specified date here. Clicking
the on Current T/E Slips button
updates the bill rate for the slips that fall on the current date specified
here.
Phase
These are the distinct parts of a project for which you have a budget and monitor actual costs. In addition, there can be hundreds of tasks that need to get done by employees by certain dates in each phase of the project. ArchiOffice comes with predefined phases (for example, Schematic Design, Design Development, etc.), but authorized users can create anything they want (for example, Parts Dept., Service Dept., etc.). Basically, phases are the parts of a job that you have a budget for with tasks assigned to team members and to which time and expenses will be entered against so you can monitor the progress of a project (actual vs. budget, progress and tasks). After adding a phase to a project, you can move that phase up in the phase order. You can also set the start and end dates for the phases that allows you to run financial reports that can project revenue over time by calculating the budgeted fee over the length of the phase.
Action
Add Template:
Add a template phase defined in Preferences for the projects. Only those template phases are listed which are not added to the project.
Add Main:
Add a root phase.
Sort A to Z:
Click to sort phases in ascending alphanumeric order.
Sort Z to A:
Click to sort phases in descending alphanumeric order.
Duplicate:
Click to duplicate the phases and their sub phases within a project. Only those job codes are duplicated that are part of the phase or sub phase.
Sub:
Add a child phase to the selected phase.
You cannot add a sub-phase
to a phase that has been included on an invoice.
When adding a sub-phase to a phase that has been used when recording
time or expense entries, all job codes, budget details, tasks
and time and expense entries are moved to the new sub-phase.
When adding a sub-phase to a phase that has not been used to record
a time or expense entry, if the Use
Task for Time option on the Projects-Tasks
screen has been enabled, all job codes, budget details, tasks,
and time and expense entries are moved to the new sub-phase. Otherwise,
the budget and job codes will be moved to the new sub-phase and
you will be given the option to move the tasks.
Delete:
Choose this option to delete a selected phase.
Move Up/Move Down:
Select one of these options to change the phase order.
Save:
Click to save changes made to listed phases.
Phase Name:
Identifies the Phase Name.
Active:
Select this check box if the phase is active and employees can enter time and expenses against it. Clear this option to prevent users from applying time or expenses against this phase. Deactivating a phase is useful if it has been completed, fully billed, or if you want to prevent additional time and expense entries for it.
The phases appear grayed
out if their Active check boxes are unmarked.
Budget Hours:
Enter the budgeted amount of time that a phase will take to complete.
Cap:
Check if the phase is hourly and is not to exceed a certain monetary amount.
This check box can only be selected if the Hourly
check box is already selected.
Hourly:
Check if the phase is hourly and should be charged as time and material above and beyond the contract fee.
Clearing this option will also clear the Cap
check box if it was already selected.
Start Date:
Enter the date on which the phase starts.
End Date:
Enter the date on which the phase ends.
Parent Phase:
When a sub-phase is selected, its parent phase displays in this read-only field.
Make this
Parent ![]() :
:
Click ![]() to move a selected child phase to the parent level.
to move a selected child phase to the parent level.
Represents the list of services you will be providing within the phases of your project. Each job code can have a rate associated with it as well. So when a time entry is recorded, the rate will be set to the bill rate of the job code rather than the employees default charge rate.
Action
Add Template:
Add a template Job Code defined in Preferences for the projects.
Add Main:
Adds a root or parent job code.
Sort A to Z:
Click to sort phases in ascending alphanumeric order.
Sort Z to A:
Click to sort phases in descending alphanumeric order.
Sub:
Adds a child job code to the selected Job Code.
Delete:
Select this option to delete a selected job code.
Move Up/ Down:
Select one of these options to change the phase order.
Code Name:
Identifies the Number and Job Code Name.
Active:
Check if the job code is active and employees can enter their time and expenses against it. If no longer needed, clear this option so users cannot apply time or expenses against the job code.
The codes appear grayed
out if their Active check boxes are unmarked.
Bill Rate:
Bill rate for a particular job code (this takes precedence over a team member's billing rate).
Service:
Choose Basic when working with fixed fee projects to use the Job Code for time that is to be part of the fixed fee. Choose Additional to have all time be billed as time and materials, in addition to the fixed fee. Generally, all job codes for expenses will be set to Basic.
Parent Job:
When a sub-task is selected, its parent task displays in this read-only field.
Make this
Parent ![]() :
:
Click ![]() to move a selected child-task to the parent level.
to move a selected child-task to the parent level.
Button Panel
Search  :
:
Use this search field to locate projects quickly. The field's predictive
search instantly displays results as you type in this field. Click  to
clear the previous search result.
to
clear the previous search result.
Active Only
Mark this check box to search only the active projects.
Previous:
Click to display the previous project record.
Next:
Click to display the next project record.
Save:
Click to save changes made to a project record.
Help:
Opens the ArchiOffice Help in the Projects section.
Action
New:
Select to create a new project.
Duplicate:
Select to duplicate an active project record.
Delete:
Select to delete a project. This is a secure privilege available only when specifically allowed in the Preferences screen.
My List:
Select to view projects assigned to you.
Find:
Use this option to locate projects matching specific criteria, with the resulting Found Set displayed in the List View.
Re-Find:
Select to return to the last Find criteria so you can modify the requests before executing the search.
Find All:
Select to view all projects.